Put a Template on your website
Putting a template onto your own website is pretty simple. This "How To" will go through each of the steps required to get a template working on your own site. We will assume that you have a template on your dashboard already that you want to embed. If not, you will need to first activate one from the Template Gallery or create you own.
There are 3 simple steps to do this:
- Activate your template
- Copy the required code
- Paste the code to your website
- Add default values if required
I'll outline each step in more detail below.
1. Activate your template
Once the template you want to embed is on your dashboard, you just need to ensure that the Active check box is ticked, like in the example below.
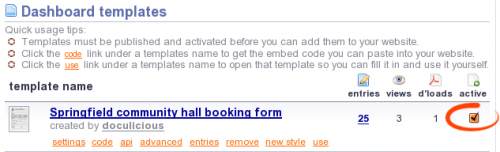
This checkbox may already be ticked, particularly if you added the template to your dashboard by clicking a link that said something like "Activate it". If thats the case, this step is done and your a third of the way there.
2. Copy the code
The word "Code" can scare some people, but don't worry because this is really simple.
Click the "code" link under the name of your Template to show the code section. Here's a screenshot of what this looks like:
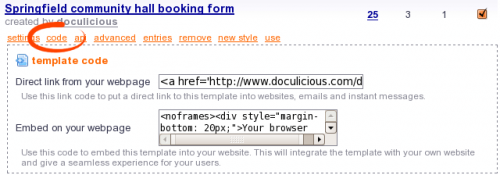
Click your mouse into the text box next to the label that says "Embed on your webpage". The text within should automatically highlight, enabling you to copy it (Press ctrl-v or right click and choose copy, or do whatever it is you Macintosh people do to copy stuff ;p)
That's it. Cool. Simple. Onto the next step ...
3. Paste it onto your website.
This bit can be a bit tricky, 'cos I don't know anything about your website or the software you use to edit it. But as long as you can access and edit the HTML, we should be fine. Just FYI, some blogs may not allow you to add your own HTML so if you have any trouble, please post to the forum and we'll see if we can help.
Ok, so you need to go to the place on your website where you can edit the content of your pages. Once there choose to edit the page that you want to place the template on. Now here you may be greeted with plain HTML or a WYSIWYG editor. If you see HTML code (Anything with open and closed brackets, ie <h1></h1> or <b></b>) then you can paste the copied code into the page wherever you want to display the template.
However, if you can see bold text and colors, then you're using a WYSIWYG editor and you cannot paste the code directly in there. You need to edit the HTML. Most WYSIWYG editors will have a button that says something like "Source" or "Code" or even just "HTML". You will need to click that so that you can paste the HTML code.
So, that's it! Easy done.
4. Add default values if required
You can pass default values through to a form by adding them to the URL of the embed code. You need to use the unique Element ID prepended with the characters "df_" and then the value to use for that element. eg:
<iframe height="600"
        allowTransparency="true"
        frameborder="0"
        scrolling="no"
        style="width:100%;border:none"
        src="http://www.doculicious.com/do/doc?dbt=132665816253ecfb-b391051af0c806c1&m=edit&df_3901593235d1dd57=PUT+DEFAULT+VALUE+HERE">
</iframe>
Only Text Box elements and Toggle Box elements are supported currently. To set a Toggle Box you need to pass through either: true or false.
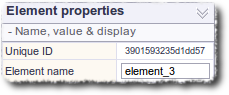
A quicker way to get all the element IDs of the elements within your form, is by using the API download from the dashboard. Click on the orange "api" link under your templates name. You should see 3 links named XML, JSON and CSV next to the heading "Download Template Fields". Clicking one of these will download a file with the details of all the elements within your form. Here is an example of the CSV output:

The ID column will contain the id that is needed in the URL.
Some extra stuff
I'd like to take a little time here to explain some changes you can make to the embed code. They are not required, but are just some explanations and extra things you can do to make your template look even better. First, I'll explain the actual code and what it consists of, then I'll talk about some changes you can make to the code to make the template fit better into your website.
What's in the Embed Code
Below is an some an example of the embed code that is copied in step 2:
<noframes>
  <div style="margin-bottom: 20px;">
    Your browser does not support frames, so you can't complete this form here.
    However, you can
    <a href="http://www.doculicious.com/img/screenshots/132665816253ecfb.pdf">
      click here to download a PDF file of this form
    </a>
  </div>
</noframes>
<iframe height="600"
        allowTransparency="true"
        frameborder="0"
        scrolling="no"
        style="width:100%;border:none"
        src="http://www.doculicious.com/do/doc?dbt=132665816253ecfb-b391051af0c806c1&m=edit">
</iframe>
<small>
  <a href="http://www.doculicious.com/">powered by doculicious</a>
</small>
</div>
The code begins with a <noframes> tag. This tag is used for backwards compatability, meaning that the contents of this tag will be displayed to anyone using a web browser that does not support frames, since only very old browsers do not support frames, this is just a nicety. Within the <noframes> tag we display a link to a download for the static PDF file of your template. This is a standard PDF that looks like an empty instance of your template. It cannot be typed into, but is better than giving users nothing.
The next piece of code, the <iframe>, is the main part, and the bit that loads your template. It's also where you can make changes to better fit the template onto your site. An <iframe> creates a box on your website within which your Doculicious template will load. There are 6 attributes within the <iframe> which can effect this box and it's contents:
- height - this is how high the box will be. If the content within the box is bigger than this, the content will display scroll bars. You can change this property to better fit into your site. Ie, you can make it larger to completly fit the template and remove any scrollbars.
- allowTransparency - This makes the box transparent, so that the colors and background images of your page will show through. Probably won't have much effect as the template will have it's own background colors.
- frameborder - The width of borders around the <iframe> box. We default this to 0.
- scrolling - Whether the <iframe> itself will have scroll bars. This should stay off as the content will supply it's own scroll bar if needed.
- style - This is where you can add your own styles to change how the <iframe> box looks. The default is to make it 100% wide and turn off the borders. However, feel free to change this and make it fit into your site by giving it a border .
- src - this is the URL that displays your template. Everything there is required. Removing anything may cause problems. However, you can add extra parameters here. Specifically, the system allows you to add up to 2 custom variables named custom1 and custom2. These can be added just like any query string by adding &custom1=somevalue to the end. This will store the value against any entry made to the template and allow to search and filter on them in the entries page.
The next tag <small> with a link to doculicious is just a little vanity by us. It's not required for your template to work, but is nice for us.
If you need to automate templates to create documents from Word or Excel files, then try out this web site by MergeOS. It will automatically merge data into Office word and Excel to create awesome looking documents in docx, xlxs and PDF format.