Create a Template
Doculicious lets you use or copy ready made templates which makes it easy getting started, but sometimes you need a specific template and nothing beats creating your own. Luckily, Doculicious provides an easy to use "Template Workshop" where creating templates is easy. In this tutorial I'm going to walk you through creating a new template from scratch, step by step. We'll be making a booking application form for a fictitious community hall, something that might have originally been a PDF download or a paper form.
I'm not going to cover everything about the template workshop in this tutorial, just the things you need to make this type of template. You'll see settings and properties that I won't talk about here ... feel free to have a play around and try them out.
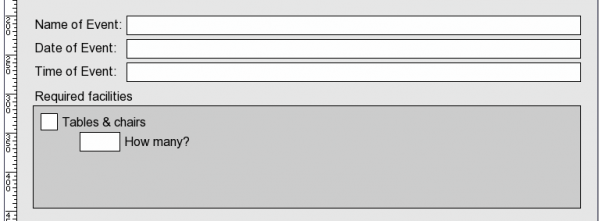
Below is a quick sketch I've made to give you an idea of the type of form we are going to make. It's a standard paper form with text fields and check boxes and an image at the top left.
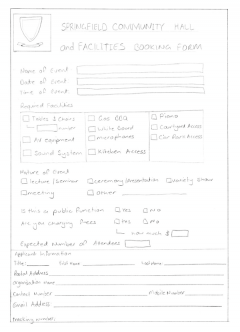
It's probably a good idea to follow along inside Doculicious and create a template as you go, but I've included screenshots of what I'm doing so you can read it all here without leaving.
Ok, so let's get started.
Step 1 - Create the new template
1a - Log in and click the 'Your templates' tab
You'll be taken to your template page.
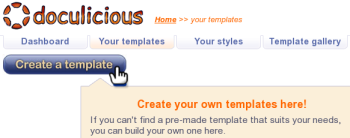
1b - Click the 'Create a template' button
This will load the Template workshop
1c - Type a Name and Description for your Template
When the template workshop loads you will see the description page for your template. At the top of the page, just below the Doculicious logo is a text box with the name of
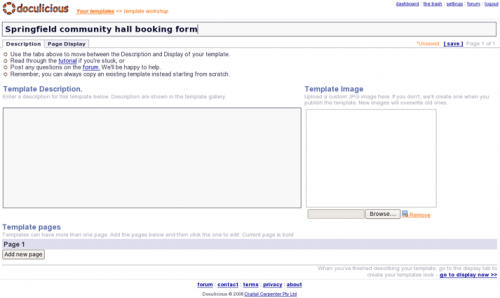
the template, currently 'Untitled'. Below this are 2 tabs - Description and Page Display. The Description tab is always the first you come to when working on a template, from here you can change a templates name, add search tags, add new pages, change a templates description or add a custom template image. The Page Display tab is where you layout the template display, and we'll be looking at that in the next step.
You'll see that the template is named 'Untitled'. We will change it now to 'Springfield Community Hall Booking Form' and add a description for our form. I won't add any tags at the moment, nor do we need to add any pages. The template image will be automatically created by the system once we publish our template, so I'll leave that empty too.
When you changed the template name or description the text *Unsaved [save] would have appeared close to the top right of the page. The blue [save] text is a link that you can click to save your changes. Do that now, and the link should disappear and be replaced with the current time, and your template will be saved.
Step 2 - Setup the template canvas
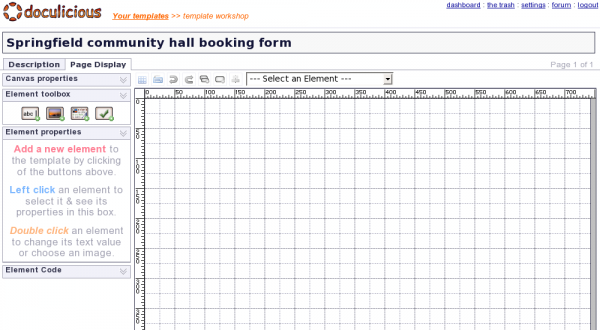
2a - Click the Page Display tab
This page is where you create the look of your template. At the top you still have the template's name field, so you can change it anytime. Below that are the Navigation Tabs you use to move from here to the Description page. Directly under the Navigation Tabs are 4 boxes titled Canvas properties, Element toolbox, Element properties and Element code. Throughout this tutorial, I'll call this the Left Menu. Menu's like these can be opened and closed by clicking the title words. The Canvas Properties and Element Properties menus both have sub-menus that can also be opened the same way. When referring to a sub-menu I will reference it by it's parent menu, ie: Parent Menu name - > Sub Menu name.
 Text Box
 Image Box
 Rich Text Box
 Toggle Box
Above the Canvas is the Toolbar. It contains the following tools:
![]() Grid toggle to turn the grid display on and off.
Grid toggle to turn the grid display on and off.
![]() Keyboard toggle to turn the keyboard shortcut display on and off.
Keyboard toggle to turn the keyboard shortcut display on and off.
![]() Undo for undoing changes.
Undo for undoing changes.
![]() Redo for re-doing changes.
Redo for re-doing changes.
![]() Clone for copying the selected element.
Clone for copying the selected element.
![]() Delete for removing the selected element from the canvas.
Delete for removing the selected element from the canvas.
![]() Align center to align the selected element with the center of the canvas.
Align center to align the selected element with the center of the canvas.
--- Select an Element --- This drop down box has the names of all the elements on the canvas. Use it to select one.
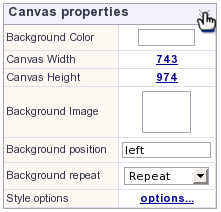
2b - Click the Canvas Properties menu to open it
This will display the settings you can change for the canvas. You'll see that the Background Color is white, and the Width is 743 and the Height is 974. (Technical note: These might seem like arbitrary numbers, but they actually represent a Letter sized page with a 1/2 inch margin at about 100dpi. The margin does not show on the canvas, but it will when the template is downloaded as a PDF. Margin sizes can be set using the "options..." link)
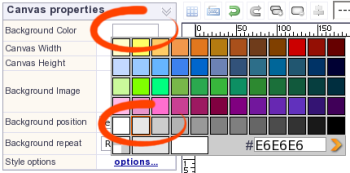
2c - Click the box to the right of Background Color
This will open a color picker from where you can choose a color. I chose the gray color next to white. You could also type a color into the text box on the color picker and click the orange arrow to apply it.
Step 3 - Adding the header text and logo image
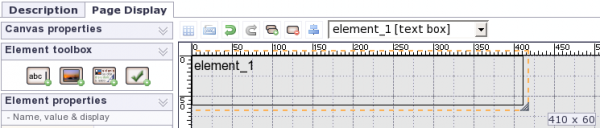
3a - Click the Text Box button to add the first Element
After clicking this you will see the new element on the canvas. Use your mouse to grab the bottom right corner of the element, and drag it out untill it is 410px wide by 60px high. The dimensions will display next to your mouse cursor as you start dragging.
3b - Double click the element to edit its text
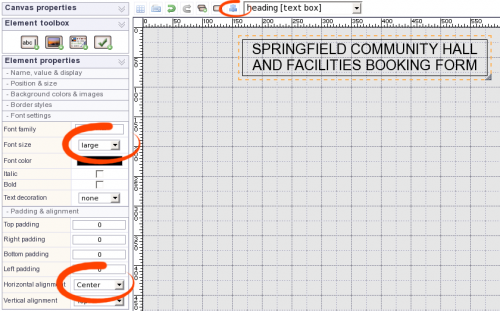
After double clicking the element you can type the text: "Springfield community hall and facilities booking form".
On the left you'll notice that the Element Properties menu now has sub-menus. These sub menus contain all the properties you can change for the selected element. Click on the Font Settings menu and change the Font Size to Large. Note that the font change effects all the text within the element. This is because these properties are for element wide settings. If you need text with bold or different colors within the same element, then you need to use a Rich Text Element, which will allow you to format individual parts of the text. Next, click on the Padding & Alignment menu and change the Horizontal alignment to Center.
We don't want this text to be editable by the people who fill in the template, so we should make it read-only. Click the Element Properties -> Name, value & display menu. Within there you can click on the Read-only check box. It's also a good idea to give your elements a name. You'll notice at the top of the Name, value & display menu there is an Element name field. You can type a name here to make it easier to find elements later. Also, these names are used as the column headings when entries are downloaded to CSV format, so it's good to have something descriptive. For forms I usually precede text field names with txt-, labels with lbl- images with img- etc This makes it nice and easy to find elements in the Element selection drop down.
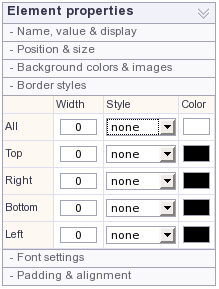
3c -Remove the border from the heading text
Make sure the heading element is selected, then click on the Element Properties -> Border Stylesmenu. This will display the different border settings we can apply to the element. In the All row, type 0 (thats a zero) in the Width column, and choose None from the Style drop down. You will see the border for the heading element disappear.
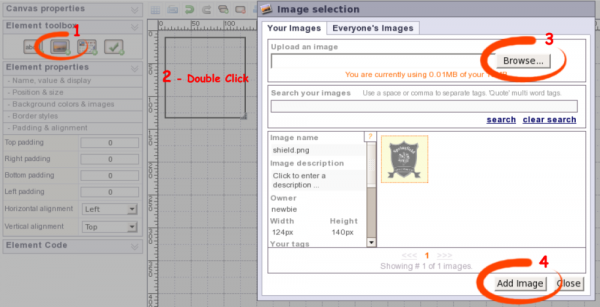
3d - Click to add an Image Box element from the Element toolbox
The new image element will appear at the top left of the template. Double click this new element and an Image Selection box will appear. At the top of this box is a Browse button you can use to upload an image. Click the browse button to choose an image to upload from your computer. It doesn't matter too much about the size of the image, as the system will resize it to fit the dimensions of the image box. Here's the image I used. Once you've uploaded the image, you'll see it at the bottom of the Image Selection box. Make sure the image is selected by clicking on it, then click the Add image button.
Now that you've added the image you can remove the borders from the element, make it read-only and give it a name. Do this the same way you did for the heading element. Then move the image element 20 pixels out from the top and the left by clicking it once with the mouse to select it, holding the [ctrl] key and pressing the down arrow and right arrows twice each. Make sure you save your template again. When working on the Page Display Tab you can save the template by pressing the s key.
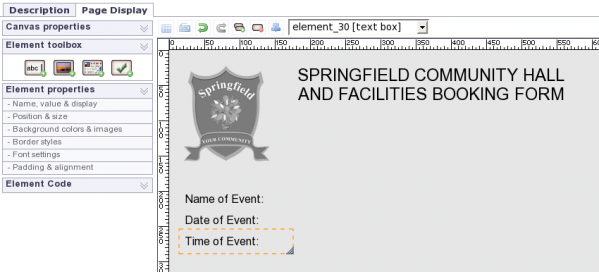
Step 4 - Adding labels and text fields
4a - Click the Text Box button to add a new element
This new element will be our first label for the template. The best way to do labels and fields is to create the first one exactly how we want it, then Clone it for the rest of the labels. So that's what we'll do.
Grab the bottom right corner of the element you just added and drag it out to be 150 wide by 23 high. When added all elements are placed at the top left. If you look in Element Properties -> Position & Size you'll see that this elements Left Position is 0 and its Top Position is also 0. Lets use this to move the element to where we want it. In the Left Position field type the '20' then press the TAB key and type '200' in the Top Position field. TAB or click out of the field to have the new position register. Now just add the text - "Name of Event", change the elements borders to '0' and 'None' like you did previously, and make the element read-only.
Now, to add new elements quickly, we can Clone existing ones. Select the "Name of event" element you just made and press the Clone tool (Clone) or use the keyboard shortcut c. You'll notice another element will have appeared just below and to the right of the one we cloned. It has been placed 10px to the right and 10px lower than the one we cloned. The nice thing about this is that to move it back in line we only need to hold the [Ctrl] key and press the left arrow once. Then press [ctrl] + down twice to put it a nice distance below the first element. Now, do this again with the newly created and selected element. Clone, [Ctrl]+ left and [ctrl] + down twice. You should now have 3 text elements, all lined up nicely, but all saying "Name of Event". Easy - just double click the new ones and change the text, all the other properties will be the same.
4b - Clone the "Name of event" label again
We will use this cloned element to create the actual text fields. Move the new element so that it's left position is 140 and it's top position is 200, then drag the bottom right corner until it is 580px wide and 23px high. Then go to Element properties -> Border styles and give it a 1 width, solid border all around.
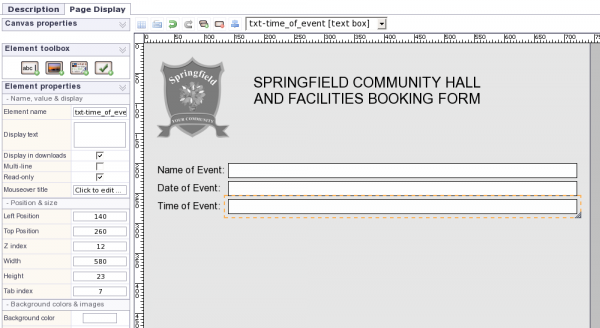
As this is a text field, it's highly recommended to give it a name, so go to Element properties -> Name, value & display and type a descriptive name for the Element name, and while you're in there, click off Read-only as we want people to be able to edit this field.
Now we can use Clone to create a second element and move it down to be the second text field, then clone that to make the third. Once you've done that, don't forget to go and give each one a unique descriptive name. You don't need to change any other properties because it was all copied from the original element. Press s to save your progress.
Step 5 - Toggle boxes and using text box elements for formatting
5a - Click to add a new Text Box element to the canvas
This step will show how you can use a Text box element to add a nice background shape to add contrast to a section. Text box elements are mainly used for text ... but we shouldn't let that hinder our creative juices - they can be used for much more. Ok, drag the new element down so that it's top position is 315 and it's 20 from the left. Double click to edit the text, press [ctrl] + a to select all then press [delete] to remove the selected text. With the element still selected, go to Element properties -> Background colors & images and choose a darker shade of gray. I chose the one 3rd from the left at the bottom (#CCCCCC). Now drag the bottom right corner of the element until it's 700 wide and 120 high.
We need a heading for this box, so click on one of the labels you made before and clone it. Then drag it down so its just above the gray box we made, (precisely, this is about Top position 292 and Left position 20). Change the text of this new label to be "Required Facilities".
5b - Click to add a Toggle Box from the Element toolbox
You'll see the toggle box will be added to the top left of the canvas. It is square with a white background and black border by default. Just like a text box element, all this can be changed to match your requirements.
One other great thing with a Toggle box is how we display the "toggle". Click on the Element properties -> Name, display & value menu. You can see that a Toggle box element has a Display Image field, with a picture of a tick in it. Just below that you'll also see a field named Checked with a check box to its right. Click the check box so that it is on. The toggle box displayed the image of the tickl! You can place any image you like as the Display Image for a toggle box. You can also make the toggle box any size you like, change its background color, borders etc. It's nice and powerful, and allows for many template designs.
We need another text entry box for the amount of tables & chairs required, so clone one of the previous text entry boxes we made, resize it so it's only 50 wide and place it under the "Tables & chairs" label. The clone the "Table & chairs" label and move it next to this text entry box, and double click to change the text to say "Number?".
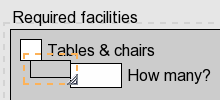
Before
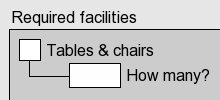
After
Now you can see on my mock-up drawing that I've put a line going from the Toggle box to the Text entry box. One way we can do that is by again using a Text entry box without text in it.
Click to add a new Text Box element from the Element tools. Remove it's text. Drag it down so that the top left corner is touching the bottom edge of the toggle box, about halfway in. Now resize it using the bottom right corner, untill it's right edge is touching the Text box element, and bring it up so it touches halfway up the element. It still looks like a box, so we need to remove the top and the right borders. Make sure it's selected and go to Element properties -> Border styles then set the top and the right border to have a Width of 0 and a Style of "None".
That's the hard part done. Now we just need to clone this toggle box and it's label to create all the other toggle boxes and labels in this section. Remember to use keyboard shortcuts and the arrow keys to move them as it makes a huge difference in speed.
5c An exercise for the reader and adding tracking codes to templates
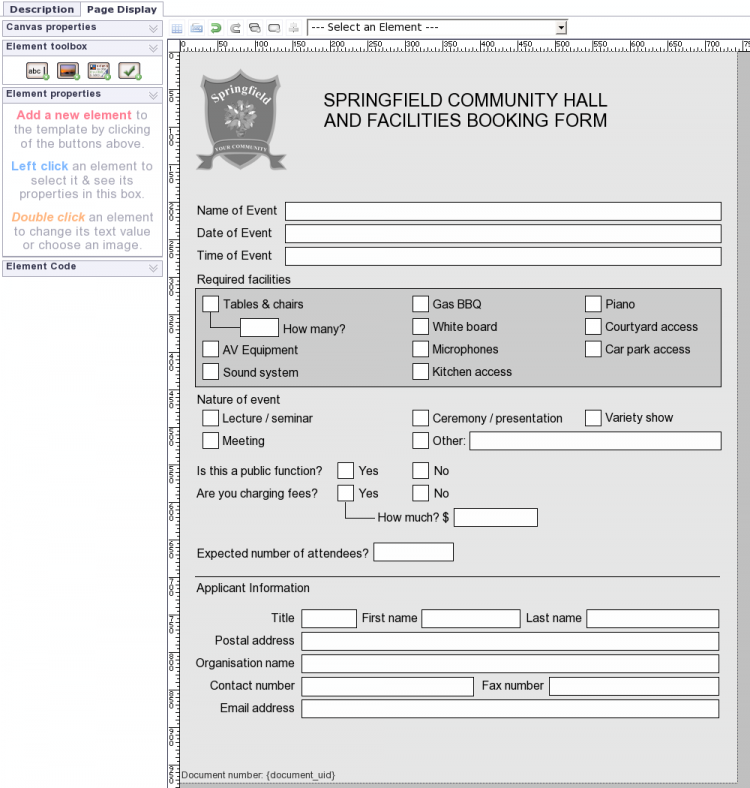
Yep, that's right, I'm going to leave the rest of the template to you. The remainder of the labels and fields can be done the same as how we've done them during the tutorial. To help you along a little, here's a screenshot of the completed template so you can see how it should look.
- In Element properties -> name, value & display change the Element Name to begin with the @ symbol. Yep, the same one as in your email address. The name can be anything, as long as it starts with @
- In the text of the element put the code {document_uid} This will be replaced with the unique code for that document. You can write anything else you'd like around it, just make sure you make the element wide enough to leave room for the replacement. The document uid will be 16 letters and numbers long.
And that's it. Whenever this template is used, the system will generate a unique ID that will be displayed. There's actually 2 other codes you can use too .. {page_number} and {total_pages} which, I'm sure you guessed, can be used to show the current page number and the total pages in the template.
Step 6 - Publishing and using your new template
6a - Publish your template
Before you can use your template, it needs to be published. You must go to the "Your templates" page to publish your template. From the Template Workshop you can click the orange "Your templates" link at the top of the page, to the right of the Doculicious logo. This will display your template list.
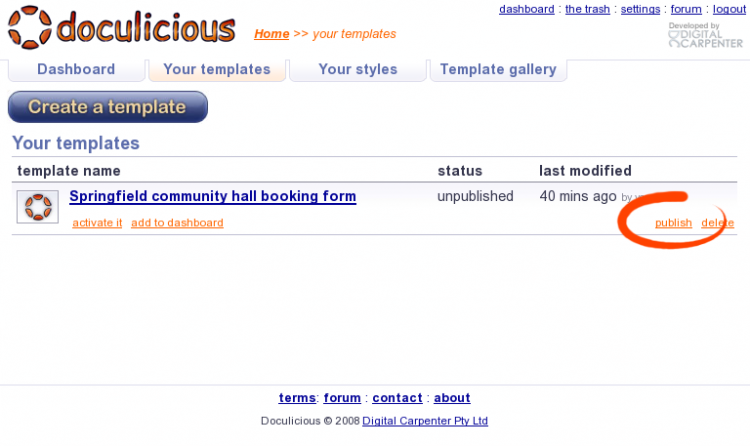
The Template list will show all the templates you have made, listing there name, status, last modified and some orange action links. From here you can Activate your template, add it to your dashboard, publish it or delete it.
Click the Publish link. It will take a few seconds to publish as the system generates the screenshots of your template and an example PDF file. Once it completes you'll notice 2 new orange action links - Copy and New style. Copy will make a complete copy of the template, which you can modify any way you like. New style will create a style for the template - which is basically a new way for the template to look, while still keeping the same entry fields.
I'll be covering styles in a later tutorial, as they are a great way to make your templates fit into a website design without losing the ability to get a great formatted PDF too.
Now that your template is published, you can add it to your dashboard, activate it and then embed it on your website. For more information on this, check out the How To: Put a template on your website. And remember, if you have any questions or comments about this tutorial, please post a message in the forum.